Some Linux Network Practices

#1 How do I find out which gateway a Linux system is currently using?

#2 How to check ip forwarding status in centos

#3 How to get information about graphics card (GPU) on Linux

#4 How to display your IP ‘only’


#1 How do I find out which gateway a Linux system is currently using?

run route -nee

toosa@toosa-T580:~$ route -nee
Kernel IP routing table
Destination     Gateway         Genmask         Flags Metric Ref    Use Iface    MSS   Window irtt
0.0.0.0         10.8.0.13       128.0.0.0       UG    0      0        0 tun0     0     0      0
0.0.0.0         192.168.100.1   0.0.0.0         UG    0      0        0 eth0     0     0      0
10.8.0.1        10.8.0.13       255.255.255.255 UGH   0      0        0 tun0     0     0      0
10.8.0.13       0.0.0.0         255.255.255.255 UH    0      0        0 tun0     0     0      0
103.28.22.33    192.168.100.1   255.255.255.255 UGH   0      0        0 eth0     0     0      0
128.0.0.0       10.8.0.13       128.0.0.0       UG    0      0        0 tun0     0     0      0
192.168.100.0   0.0.0.0         255.255.255.0   U     1      0        0 eth0     0     0      0

#2 How to check  ip forwarding status in centos?

[root@server ~]# /sbin/sysctl net.ipv4.ip_forward
net.ipv4.ip_forward = 1

1 - mean ip forwarding is on
0 - mean ip forwarding is off

#3 How to get information about graphics card (GPU) on Linux

toosa@toosa-T580:~$ lspci -vnn | grep VGA -A 12
00:02.0 VGA compatible controller [0300]: Intel Corporation Core Processor Integrated Graphics Controller [8086:0046] (rev 02) (prog-if 00 [VGA controller])
	Subsystem: Fujitsu Limited. Core Processor Integrated Graphics Controller [10cf:150e]
	Flags: bus master, fast devsel, latency 0, IRQ 27
	Memory at f4000000 (64-bit, non-prefetchable) [size=4M]
	Memory at d0000000 (64-bit, prefetchable) [size=256M]
	I/O ports at 1800 [size=8]
	Expansion ROM at <unassigned> [disabled]
	Capabilities: <access denied>
	Kernel driver in use: i915
	Kernel modules: i915

00:16.0 Communication controller [0780]: Intel Corporation 5 Series/3400 Series Chipset HECI Controller [8086:3b64] (rev 06)
	Subsystem: Fujitsu Limited. 5 Series/3400 Series Chipset HECI Controller [10cf:152b]

The first line has the name of the vendor, the model name/series and the pci id. The first part (8086) indicates the vendor id (which is Intel here) and the second number (0046) indicates the pci id, which indicates the model of the graphics unit.

The lshw command can also be used to get the above information

oosa@toosa-T580:~$ sudo lshw -numeric -C display
  *-display               
       description: VGA compatible controller
       product: Core Processor Integrated Graphics Controller [8086:46]
       vendor: Intel Corporation [8086]
       physical id: 2
       bus info: pci@0000:00:02.0
       version: 02
       width: 64 bits
       clock: 33MHz
       capabilities: msi pm vga_controller bus_master cap_list rom
       configuration: driver=i915 latency=0
       resources: irq:27 memory:f4000000-f43fffff memory:d0000000-dfffffff ioport:1800(size=8)

#4 How to display your IP ‘only’

$ ifconfig wlan0 | grep "inet " | awk -F'[: ]+' '{ print $4 }'


192.168.1.2

Ubuntu Unity ke Xubuntu

Ternyata diberi fasilitas yang sophisticated seperti Unity Desktop ada juga masa-masa bosan nya. Kebutuhan ruang memory juga menjadi alasan berfikir untuk menggunakan desktop yang lebih ringan. Setelah mencoba dan sedikit bernostalgia dengan beberapa desktop dan window manager seperti blackbox, fluxbox, openbox, enlightment, icewm, dll; akhirnya pilihan jatuh ke xfce 🙂
Tetapi kemanjaan-kemanjaan yang diberikan Unity dan Gnome masih agak sulit dilepaskan he3x, akhirnya terpikir langkah praktis untuk switch saja dari Ubuntu ke Xubuntu. Ow ternyata caranya sama sekali tidak sulit :

#sudo apt-get install xubuntu-desktop gksu leafpad synaptic

Done !

Sementara Unity nya tetap akan di keep dulu, karena itu tinggal logout -> pilih Xubuntu -> login, kemudian Zappp !! Terasa betul ringannya, dual screen juga langsung terdeteksi, berkenalan dengan gmusicbrowser,

thunar file manager yang minimalis tapi powerfull,

Xfce4 Screenshooter

Bekerja dengan Netbeans juga tidak ada kendala

Walaupun sekarang sudah menggunakan Xubuntu dengan XFCE nya, tapi Unitiy masih tetap tersedia

Jika akan menghilangkan jejak Unity, maka dapat menggunakan perintah berikut ini :

sudo apt-get remove nautilus gnome-power-manager gnome-screensaver gnome-termina* gnome-pane* gnome-applet* gnome-bluetooth gnome-desktop* gnome-sessio* gnome-user* gnome-shell-common compiz compiz* unity unity* hud zeitgeist zeitgeist* python-zeitgeist libzeitgeist* activity-log-manager-common gnome-control-center gnome-screenshot overlay-scrollba* && sudo apt-get install xubuntu-community-wallpapers && sudo apt-get autoremove

Salam,

Pemecahan kasus LC_ALL = (unset) di Ubuntu

Bila menemui pesan kesalahan seperti ini atau yang mirip:

perl: warning: Setting locale failed.   
perl: warning: Please check that your locale settings:
....
perl: warning: Falling back to the standard locale ("C").   
locale: Cannot set LC_CTYPE to default locale: No such file or directory   
locale: Cannot set LC_MESSAGES to default locale: No such file or directory   
locale: Cannot set LC_ALL to default locale: No such file or directory

Silahkan dicoba pemecahannya dengan cara berikut:

$ sudo locale-gen "en_US.UTF-8"

lalu 

$ sudo dpkg-reconfigure locales

Semoga berhasil !

Mouse di Ubuntu 14.04 tidak terkendali ?

Saya beberapa kali mengalami kejadian berupa kursor mouse yang tiba-tiba berpindah ke sisi lain dari screen tanpa kita gerakkan, bahkan melakukan klik di tempat yang tidak diduga. Hal ini sangat mengganggu. Ternyata hal ini kemungkinan  disebabkan oleh kerusakan atau gangguan pada TrackPad atau Touchpad laptop. Bisa jadi karena kotor atau penyebab lainnya. Cara yang paling praktis adalah dengan mematikan fungsi track/touch pad tersebut lalu menggunakan mouse untuk sementara waktu atau permanen. Jika Keyboard Anda tidak memiliki fungsi (fn) untuk mematikan/menghidupkan touch pad, maka cara dibawah ini masih bisa Anda lakukan melalui terminal.

Untuk mematikan track/touch pad tersebut Anda perlu terlebih dahulu mencari ‘id’ dari device tersebut, caranya :

xinput list

Contoh hasilnya adalah sebagai berikut :

xlist_input

Disitu terlihat bahwa TouchPad pada laptop saya ( SynPS/2 Synaptics TouchPad )  memiliki ‘id’ = 21. Untuk menonaktifkan touchpad tersebut lakukanlah perintah seperti berikut ini :

xinput –disable 21

Untuk mengaktifkan kembali caranya :

xinput –enable 21

Demikianlah, semoga bermanfaat 🙂 Salam opensource !


Memperbaiki masalah “locale”

Masalah yang selalu munculnya teks seperti di bawah ini:

perl: warning: Setting locale failed.   
perl: warning: Please check that your locale settings:   
        LANGUAGE = "en_US:en",   
        LC_ALL = (unset),   
        LC_MESSAGES = "en_US.UTF-8",   
        LANG = "en_US.UTF-8"   
    are supported and installed on your system.   
perl: warning: Falling back to the standard locale ("C").   
locale: Cannot set LC_CTYPE to default locale: No such file or directory   
locale: Cannot set LC_MESSAGES to default locale: No such file or directory   
locale: Cannot set LC_ALL to default locale: No such file or directory   
(Reading database ... 21173 files and directories currently installed.)  
Removing bind9 ...  
 * Stopping domain name service... bind9                                        [ OK ]
Processing triggers for man-db ...   
locale: Cannot set LC_CTYPE to default locale: No such file or directory   
locale: Cannot set LC_MESSAGES to default locale: No such file or directory   
locale: Cannot set LC_ALL to default locale: No such file or directory

Berikut salah satu cara untuk menanggulanginya, kalau tidak berhasil silahkan cari cari lainnya ya 🙂

  1. Jalankan perintah locale untuk melihat locales apa yang sedang terpasang
    $ locale
    LANG=C
    LANGUAGE=
    LC_CTYPE=fi_FI.UTF-8
    LC_NUMERIC="C"
    LC_TIME="C"
    LC_COLLATE=fi_FI.UTF-8
    LC_MONETARY="C"
    LC_MESSAGES=fi_FI.UTF-8
    LC_PAPER="C"
    LC_NAME="C"
    LC_ADDRESS="C"
    LC_TELEPHONE="C"
    LC_MEASUREMENT="C"
    LC_IDENTIFICATION="C"
    LC_ALL=
  2. Kemudian kita bangun locale yang belum terpasang dan direconfigure

    $ sudo locale-gen "en_US.UTF-8"
    Generating locales...
      en_US.UTF-8... done
    Generation complete.
    
    $ sudo dpkg-reconfigure locales
    Generating locales...
      en_US.UTF-8... up-to-date
    Generation complete.

Semoga berhasil ! 🙂

Beberapa perintah untuk mendapatkan informasi hardware di linux


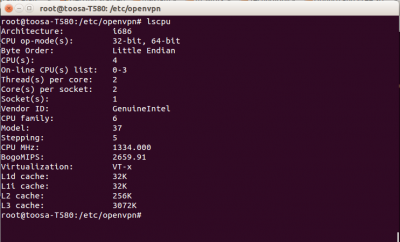
1. lscpu
lspcu akan memberikan laporan tentang cpu dan unit prosesingnya secara sederhana.

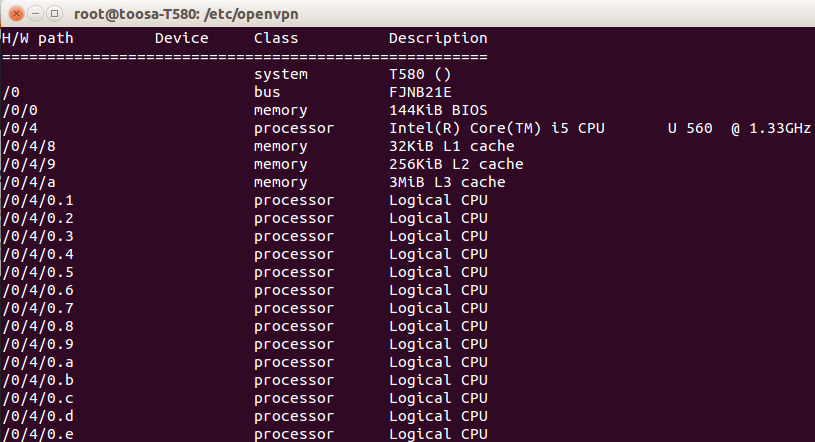
2. lshw

Perintah ini akan memberikan informasi lebih terinci tentang berbagai hardaware yang ada seperti cpu, memory, disk, usb controllers, network adapters, dsb. lshw ini mengambil informasi dari berbagai berkas/file di direktori /proc

3. hwinfo

Perintah hwinfo ini belih rinci di bandingkan dengan lshw.


  • References :
    http://www.binarytides.com/linux-commands-hardware-info/

Configuring DNS in an openVPN based routing VPN setup

Hi all

I have an openVPN server which is configured for routing based VPN. Multiple clients connect to this VPN server.

The network address range for the VPN is 10.111.10.0/24
The server’s VPN IP address is 10.111.10.1
The server is also connected directly on the internet with a static IP address on eth0 – some p.q.r.s

Right now I end up addressing all the clients and the server using IP addresses. But I intend to set up different services on the server like a mailhost, git, apache, etc. and I plan to use different hostnames for all of these services but all running on the same server. I’m planning to use a private domain example.site for all the hosts in the VPN.

Could someone guide me through the setup for this ?

I’ve already installed the bind package and went through pages about BIND and named.conf, the zones and such. But it is still kind of confusing how do I put all these together.
Also, what DNS options should I be pushing to the openVPN clients so that their resolv.conf can use the DNS server on the VPN for querying only the hostnames for the example.site domain. All other queries should go through the client’s default nameserver already in the resolv.conf.

Thanks.

UPDATE:

I was able to set up the name server for my VPN and it seems to be working. I’m also able to push the DOMAIN and DNS server options from my openvpn server.conf. And all the clients are able to resolve the hostname using either just hostnames or hostname.example.site. Now I’d like to enable dynamic DNS updates for enabling the clients to register themselves with the name server server on the VPN so that multiple clients can also address each other using hostnames. Could some one help me with that ?

These are my config files.

/etc/named.conf

Code:
options {
    directory "/var/lib/named";
    managed-keys-directory "/var/lib/named/dyn/";
    dump-file "/var/log/named_dump.db";
    statistics-file "/var/log/named.stats";
    listen-on-v6 { none; };
    notify no;
    disable-empty-zone "1.0.0.0.0.0.0.0.0.0.0.0.0.0.0.0.0.0.0.0.0.0.0.0.0.0.0.0.0.0.0.0.IP6.ARPA";
    include "/etc/named.d/forwarders.conf";
     allow-query { 127.0.0.1; 10.111.10/24; };
     listen-on port 53 { 127.0.0.1; 10.111.10.1; };
};

zone "." in {
    type hint;
    file "root.hint";
};

zone "localhost" in {
    type master;
    file "localhost.zone";
};

zone "0.0.127.in-addr.arpa" in {
    type master;
    file "127.0.0.zone";
};

zone "0.0.0.0.0.0.0.0.0.0.0.0.0.0.0.0.0.0.0.0.0.0.0.0.0.0.0.0.0.0.0.ip6.arpa" in {
    type master;
    file "127.0.0.zone";
};

include "/etc/named.conf.include";
logging {
    category default { log_syslog; };
    channel log_syslog { syslog; };
};
 zone "example.site" in {
     file "master/example.site";
    type master;
    allow-transfer { any; };
};
 zone "10.111.10.in-addr.arpa" in {
     file "master/10.111.10.in-addr.arpa";
    type master;
     allow-transfer { any; };
  };

/var/lib/named/master/example.site

Code:
$TTL 2d
 @        IN SOA        ns1.example.site.    root.example.site. (
                2012052901    ; serial
                3h        ; refresh
                1h        ; retry
                1w        ; expiry
                1d )        ; minimum

 example.site.    IN MX        0 mothership.example.site.
 example.site.    IN NS        mothership.example.site.
 mothership    IN A        10.111.10.1
ns1        IN CNAME    mothership
mail        IN CNAME    mothership

/var/lib/named/master/10.111.10.in-addr.arpa

Code:
$TTL 2d
 @        IN SOA        ns1.example.site.    root.example.site. (
                2012053000    ; serial
                3h        ; refresh
                1h        ; retry
                1w        ; expiry
                1d )        ; minimum

 10.111.10.in-addr.arpa.    IN NS        ns1.example.site.
 1.10.111.10.in-addr.arpa.    IN PTR        mothership.example.site.

Set static client’s VPN IP

Kali ini kita akan memberikan static VPN IP untuk setiap client openVPN :

buatlah sebuah direktori ccd di bawah /etc/openvpn/:

mkdir /etc/openvpn/ccd

Tambahkan satu baris di  OpenVPN server.conf  yang berada di bawah  /etc/openvpn/,:

client-config-dir ccd

simpan.

Sekarang di dalam /etc/openvpn/ccd kita buat sebuah file untuk setiap user agar memiliki ip address yang tetap. Anda harus memberi nama file persama dengan username dari VPN, jika Anda menambahkan user melalui perintah useradd di mesin lokal, atau menggunakan user yang dibuat dalam FreeRADIUS, maka nama file tersebut harus sama dengan nama username.

Contoh : saya memiliki username : smk1jkt dan dalam file OpenVPN server.conf kita gunakan subnet 10.8.0.0/24, jika kita ingin memberikan smk1jkt IP 10.8.0.100 kita lakukan di bawah ini :

cd /etc/openvpn/ccd/
touch safesrv

Dan kemudian tambahkan satu baris ke dalam file yang bernama smk1jkt :

ifconfig-push 10.8.0.100 10.8.0.101

Restart OpenVPN:

service openvpn restart

User smk1jkt akan mendapat  IP 10.8.0.100 =)

Deteksi port menggunakan nmap

Apakah itu Port?
Ada beberapa lapisan (layer) dalam model jaringan OSI. Lapisan Transport adalah lapisan yang berkaitan dengan masalah komunikasi diantara layanan dan aplikasi yang berbeda. Dilapisan inilah yang namanya Port memiliki keterkaitan.

Jika Anda belum memasang nmap, silahkan install dengan cara :

Debian/Ubuntu : #sudo apt-get install nmap
Centos/RedHat : #sudo yum install nmap

Misalkan untuk mendeteksi apakah server yang dituju membuka service port berapa saja antara 1 s/d 10000:

#nmap -P1-10000 <IP atau domain name yang dituju>

Contoh :

toosa@toosa-T580:~$ nmap -p1-10000 localhost

Starting Nmap 6.40 ( http://nmap.org ) at 2014-07-23 11:37 WIB
Nmap scan report for localhost (127.0.0.1)
Host is up (0.00031s latency).
Not shown: 9988 closed ports
PORT     STATE SERVICE
21/tcp   open  ftp
22/tcp   open  ssh
25/tcp   open  smtp
80/tcp   open  http
139/tcp  open  netbios-ssn
443/tcp  open  https
445/tcp  open  microsoft-ds
631/tcp  open  ipp
3306/tcp open  mysql
5432/tcp open  postgresql
5433/tcp open  pyrrho
5434/tcp open  unknown

Nmap done: 1 IP address (1 host up) scanned in 0.23 seconds
1 2 3 4