
Student aktif per course Banyaknya student aktif per course pada bulan Oktober 2025, hanya untuk course dengan lebih dari 100
Panduan Lengkap: Remote Server Lokal via Cloudflare Tunnel (VS Code, Termius, & Rsync)
Memiliki server development di rumah memang menyenangkan, tapi bagaimana jika kita ingin coding dari kafe atau luar kota tanpa harus membuka celah keamanan (port forwarding) di router rumah?
Solusi paling modern dan aman saat ini adalah menggunakan Cloudflare Tunnels berpadu dengan Cloudflare Access (Zero Trust). Dengan cara ini, server kita tetap tersembunyi dari internet publik, tapi kita bisa mengaksesnya menggunakan otentikasi One-Time Password (OTP) yang dikirim via email.
Artikel ini adalah catatan pribadi saya tentang bagaimana mengonfigurasi PC klien (Windows) agar bisa menggunakan VS Code Remote SSH, Termius, dan Rsync untuk menembus tunnel Cloudflare tersebut dengan mulus.

🛠️ Persiapan Awal di Laptop Klien (Windows)
Asumsinya, Anda sudah membuat tunnel di server lokal Anda dan mengonfigurasi domain (misalnya sshdev22.digitos.id) di dashboard Cloudflare Zero Trust. Sekarang, kita perlu menyiapkan laptop klien.
1. Instalasi cloudflared
Kita butuh aplikasi cloudflared berjalan di latar belakang laptop untuk membuka jalan.
Sangat disarankan untuk meletakkan file ini di folder yang tidak memiliki spasi pada namanya (jangan di Program Files) agar VS Code tidak kebingungan.
- Unduh
cloudflared.exeuntuk Windows dari rilis resmi GitHub Cloudflare. - Buat folder baru di drive C, misalnya
C:\Cloudflared. - Pindahkan file yang diunduh ke folder tersebut dan pastikan namanya adalah
cloudflared.exe.
🚀 1. Setup VS Code Remote SSH
Tantangan utama VS Code adalah ia memiliki klien SSH bawaan yang kadang gagal membaca environment variables atau path yang rumit di Windows.
Langkah A: Edit File Konfigurasi SSH
Buka file C:\Users\NamaUser\.ssh\config dan tambahkan konfigurasi host server Anda:
Host sshdev22.digitos.id
    ProxyCommand C:\Cloudflared\cloudflared.exe access ssh --hostname %h
(Perhatikan penggunaan path absolut yang bersih tanpa spasi dan tanpa tanda kutip).
Langkah B: Pancing Otentikasi OTP
Buka Command Prompt (CMD) biasa di Windows, lalu jalankan:
ssh [email protected]
Aplikasi akan membuka web browser otomatis. Masukkan email, dapatkan kode OTP, dan setujui ( Approve ). Setelah berhasil login di CMD, biarkan CMD tersebut. Token kini sudah tersimpan di laptop.
Langkah C: Kunci Platform di VS Code (Mengatasi Error “Canceled”)
Terkadang VS Code gagal terhubung karena timeout saat menunggu kita memilih sistem operasi server. Agar VS Code otomatis tahu server kita adalah Linux:
- Buka VS Code, tekan
Ctrl + Shift + P-> pilih Preferences: Open User Settings (JSON). - Tambahkan baris berikut di bagian paling bawah (sebelum kurung kurawal penutup):
"remote.SSH.remotePlatform": {
    "sshdev22.digitos.id": "linux"
}
Sekarang Anda bisa menggunakan ekstensi Remote – SSH di VS Code dan langsung masuk ke server!
🔑 2. Login Otomatis Tanpa Password (SSH Keys)
Agar tidak perlu mengetikkan password server setiap kali VS Code terhubung (setelah lolos OTP Cloudflare), gunakan SSH Key.
- Buka CMD di Windows, buat kunci (jika belum punya):
ssh-keygen -t ed25519 -C "Laptop-Remote"(tekan Enter terus sampai selesai, kosongkan passphrase). - Buka file
C:\Users\NamaUser\.ssh\id_ed25519.pubdengan Notepad, dan Copy seluruh isinya. - Di dalam server lokal Anda (bisa lewat VS Code terminal yang sudah terhubung), buka file
~/.ssh/authorized_keysdan Paste kuncinya di baris paling bawah. - Tambahkan
IdentityFiledi file config SSH Windows Anda:
Host sshdev22.digitos.id
    ProxyCommand C:\Cloudflared\cloudflared.exe access ssh --hostname %h
    IdentityFile ~/.ssh/id_ed25519
💻 3. Akses Menggunakan Termius (Local Port Forwarding)
Aplikasi SSH GUI seperti Termius tidak bisa membaca perintah ProxyCommand di file config. Jadi kita gunakan trik Local Port Forwarding.
Langkah A: Buka Jembatan Lokal
Buka CMD di Windows, jalankan perintah ini (jangan ditutup selama pakai Termius):
C:\Cloudflared\cloudflared.exe access tcp --hostname sshdev22.digitos.id --url localhost:2222
Troubleshooting: Jika muncul error bind: Only one usage of each socket address, artinya port 2222 masih menyangkut di proses sebelumnya. Matikan paksa dengan perintah:
taskkill /F /IM cloudflared.exe /T
Langkah B: Setup Termius
Di aplikasi Termius, buat profil host baru dengan pengaturan:
- Address:
127.0.0.1 - Port:
2222 - Username:
username_server - Password/Keys: Masukkan password atau pilih SSH Key.
Klik Connect, dan Anda langsung tembus ke server!
📂 4. Transfer File Cepat dengan Rsync
Kabar baiknya, karena pengaturan ProxyCommand sudah ada di ~/.ssh/config, rsync akan secara otomatis menumpang tunnel Cloudflare tersebut tanpa perlu konfigurasi tambahan.
Gunakan Git Bash atau WSL di Windows Anda untuk menjalankan rsync:
rsync -avzP /c/Users/NamaUser/Documents/ProjectLokal/ [email protected]:/home/username_server/web/
Bagaimana jika Rsync dari Server lain ke Server lokal ini?
Sama saja! Pastikan server sumber juga sudah terinstal cloudflared. Lakukan pancingan ssh terlebih dahulu di terminal server sumber. Nanti akan muncul URL di terminal. Copy URL tersebut, buka di browser laptop Anda untuk persetujuan OTP. Setelah disetujui, rsync di server sumber siap dijalankan. Jika butuh otomatisasi cronjob (tanpa campur tangan manusia), Anda bisa menggunakan fitur Service Tokens dari Cloudflare.
Ditulis untuk dokumentasi pengembangan infrastruktur lokal di Digitos. Semoga bermanfaat!
Moodle Queries (SQL) Series #1
Student aktif per course
Banyaknya student aktif per course pada bulan Oktober 2025, hanya untuk course dengan lebih dari 100 student aktif.
SELECT
    c.id AS courseid,
    c.fullname AS coursename,
    COUNT(DISTINCT l.userid) AS active_students
FROM mdl_logstore_standard_log l
JOIN mdl_course c ON c.id = l.courseid
JOIN mdl_role_assignments ra ON ra.userid = l.userid
JOIN mdl_context ctx ON ctx.id = ra.contextid
WHERE
    ctx.contextlevel = 50  -- contextlevel 50 = course
    AND ctx.instanceid = c.id
    AND ra.roleid = 5       -- roleid 5 = student
    AND l.timecreated BETWEEN UNIX_TIMESTAMP('2025-10-01 00:00:00')
                           AND UNIX_TIMESTAMP('2025-10-31 23:59:59')
GROUP BY c.id, c.fullname
HAVING active_students > 100
ORDER BY active_students DESC;
Active users menggunakan tabel mdl_users_lastaccess
“active” = enrolled + accessed the course recently
SELECT
    c.id AS courseid,
    c.fullname AS coursename,
    COUNT(DISTINCT CASE
        WHEN ula.timeaccess BETWEEN UNIX_TIMESTAMP('2025-10-01 00:00:00')
                               AND UNIX_TIMESTAMP('2025-10-31 23:59:59')
        THEN ula.userid END) AS active_students,
    COUNT(DISTINCT ra.userid) AS total_students,
    ROUND(
        (COUNT(DISTINCT CASE
            WHEN ula.timeaccess BETWEEN UNIX_TIMESTAMP('2025-10-01 00:00:00')
                                   AND UNIX_TIMESTAMP('2025-10-31 23:59:59')
            THEN ula.userid END)
         / COUNT(DISTINCT ra.userid)) * 100, 2
    ) AS active_percentage
FROM mdl_course c
JOIN mdl_context ctx
    ON ctx.contextlevel = 50 AND ctx.instanceid = c.id
JOIN mdl_role_assignments ra
    ON ra.contextid = ctx.id AND ra.roleid = 5  -- 5 = student
LEFT JOIN mdl_user_lastaccess ula
    ON ula.courseid = c.id AND ula.userid = ra.userid
GROUP BY c.id, c.fullname
HAVING active_students > 100
ORDER BY active_students DESC;
psql command line tutorial and cheat sheet
Ganti Sessions File system ke Database
Secara default sessions pada moodle diletakkan pada file system di moodledata dengan nama folder */[moodledata]/sessions* . Ada kalanya kita perlu meletakkan sessions tersebut di database untuk beberapa alasan:
- Kemudahan pemeliharaan
- Kecepatan
Kita bisa menggunakan database table, yaitu mdl_sessions menggunakan memory database seperti Memcache dan Redis
Yang paling mudah adalah konversi ke tabel database, yaitu tinggal meletakkan parameter baru di config.php
$CFG->sessionhandler = ‘database’;
Bila table mdl_sessions belum ada, maka moodle akan membuatkannya untuk Anda
Untuk menggunakan redis dan memcache akan saya tuangkan pada tulisan yang berbeda.
Selamat mencoba
Upgrade Nginx 1.18 to Nginx 1.26 (Official Nginx Repository)
To upgrade Nginx 1.18 to Nginx 1.26 on Ubuntu 22.04 (Jammy Jellyfish), you need to install it from the official Nginx repository instead of the default Ubuntu repository (which contains outdated versions). Here’s the step-by-step guide:
Step 1: Remove Old Nginx Version
First, check your current installed Nginx version:
nginx -v
If it’s 1.18, remove it to prevent conflicts:
sudo apt remove nginx nginx-core nginx-common -y
sudo apt autoremove -y
Step 2: Add the Official Nginx Repository
Since the Ubuntu repository only provides older versions, add the official Nginx repository.
- Import the Nginx GPG key:
curl -fsSL https://nginx.org/keys/nginx_signing.key | sudo tee /usr/share/keyrings/nginx-archive-keyring.gpg > /dev/null
- Add the official Nginx repository:
echo "deb [signed-by=/usr/share/keyrings/nginx-archive-keyring.gpg] http://nginx.org/packages/ubuntu jammy nginx" | sudo tee /etc/apt/sources.list.d/nginx.list
Step 3: Update Package List and Install Latest Nginx
sudo apt update
sudo apt install nginx -y
Jika terjadi error seperti ini:
# sudo apt update
Get:1 http://nginx.org/packages/ubuntu jammy InRelease [3,581 B]
Err:1 http://nginx.org/packages/ubuntu jammy InRelease
  The following signatures couldn't be verified because the public key is not available: NO_PUBKEY ABF5BD827BD9BF62
Hit:2 http://id.archive.ubuntu.com/ubuntu jammy InRelease
Get:3 http://id.archive.ubuntu.com/ubuntu jammy-updates InRelease [128 kB]
Hit:4 http://id.archive.ubuntu.com/ubuntu jammy-backports InRelease
Get:5 http://id.archive.ubuntu.com/ubuntu jammy-security InRelease [129 kB]
Reading package lists... Done
W: GPG error: http://nginx.org/packages/ubuntu jammy InRelease: The following signatures couldn't be verified because the public key is not available: NO_PUBKEY ABF5BD827BD9BF62
E: The repository 'http://nginx.org/packages/ubuntu jammy InRelease' is not signed.
N: Updating from such a repository can't be done securely, and is therefore disabled by default.
N: See apt-secure(8) manpage for repository creation and user configuration details.
Pesan kesalahan tersebut muncul karena kunci GPG untuk repository NGINX belum tersedia di sistem Anda, sehingga apt tidak dapat memverifikasi keaslian paket dari repository tersebut.
Berikut adalah cara untuk menambahkan kunci publik yang hilang (ABF5BD827BD9BF62) dan memperbaiki masalah ini:
Hapus repository yang lama jika ada:
sudo rm /etc/apt/sources.list.d/nginx.listTambahkan ulang repository NGINX dengan metode signed-by:
# Unduh kunci dan simpan dengan benar
curl -fsSL https://nginx.org/keys/nginx_signing.key | gpg --dearmor | sudo tee /usr/share/keyrings/nginx-archive-keyring.gpg > /dev/null
Tambahkan repository NGINX dengan opsi signed-by:
echo "deb [signed-by=/usr/share/keyrings/nginx-archive-keyring.gpg] http://nginx.org/packages/ubuntu jammy nginx" | sudo tee /etc/apt/sources.list.d/nginx.listPerbarui indeks paket:
sudo apt update
sudo apt install nginx -y
Step 4: Verify Nginx Installation
Check the installed version:
nginx -v
It should now show 1.27.0 or the latest stable version.
Step 5: Restart and Enable Nginx
sudo systemctl restart nginx
sudo systemctl enable nginx
(Optional) Step 6: Verify Nginx is Running
Check if Nginx is running:
sudo systemctl status nginx
Check if it’s listening on port 80:
sudo ss -tulnp | grep nginx
Done !
But if You saw some thing like
W: GPG error: http://nginx.org/packages/ubuntu jammy InRelease: The following signatures couldn't be verified because the public key is not available: NO_PUBKEY ABF5BD827BD9BF62It looks like the GPG key for the official Nginx repository is missing or not properly added. Let’s fix this step-by-step.
Step 1: Remove the Old Key (If Exists)
sudo rm -f /usr/share/keyrings/nginx-archive-keyring.gpg
Step 2: Import the Correct GPG Key
Now, add the correct Nginx GPG key:
curl -fsSL https://nginx.org/keys/nginx_signing.key | gpg --dearmor | sudo tee /usr/share/keyrings/nginx-archive-keyring.gpg > /dev/null
Verify that the key has been added:
gpg --show-keys /usr/share/keyrings/nginx-archive-keyring.gpg
It should display something like:
pub   rsa4096 2011-08-19 [SC]
      ABF5 BD82 7BD9 BF62
Step 3: Correct the Nginx Repository Configuration
Now, re-add the Nginx repository, ensuring it references the signed key correctly:
echo "deb [signed-by=/usr/share/keyrings/nginx-archive-keyring.gpg] http://nginx.org/packages/ubuntu jammy nginx" | sudo tee /etc/apt/sources.list.d/nginx.list
Step 4: Update and Install Nginx
Try updating your package list again:
sudo apt update
If no errors appear, proceed with installing Nginx:
sudo apt install nginx -y
Step 5: Verify the Installation
Check the installed Nginx version:
nginx -v
If it shows 1.27, the upgrade was successful. 🎉
Troubleshooting
If you still get a NO_PUBKEY error, try manually adding the key:
sudo apt-key adv --keyserver keyserver.ubuntu.com --recv-keys ABF5BD827BD9BF62
Then update again:
sudo apt update
That should fix the issue.
Seputar Reverse Proxy #1
Case #1: Header Host
Misalkan Anda memiliki server Nginx yang bertindak sebagai reverse proxy untuk server backend yang menjalankan aplikasi web di http://localhost:8080. Konfigurasi Nginx Anda mungkin terlihat seperti ini:
server {
  listen 80;
  server_name example.com;

  location / {
    proxy_pass http://localhost:8080;
    proxy_set_header Host $host;
  }
}
Dalam hal ini, ketika klien meminta http://example.com, Nginx akan meneruskan permintaan ke http://localhost:8080, tetapi akan mengatur header Host dalam permintaan yang diteruskan ke example.com . Ini memastikan bahwa aplikasi web di server backend menerima hostname yang benar.
proxy_set_header Host $host; adalah direktif penting dalam konfigurasi reverse proxy Nginx. Ini memastikan bahwa server backend menerima hostname asli yang diminta oleh klien, yang penting untuk banyak aplikasi web dan konfigurasi server.
Menampilkan header yang dikirim dari Proxy ke Backend
Berikut adalah kode php yang dapat digunakan untuk menampilkan parameter, header yang dikirim dari Proxy ke backend. Code ini dieksekusi di backend server
<?php
   print_r(getallheaders());
?>
Ouput nya kira-kira seperti ini
--cut--
MoodleSession=m0bjujua4pt889vm40snrsik01 [Accept-Encoding] => gzip, deflate, br, zstd [Sec-Fetch-Dest] => document [Sec-Fetch-User] => ?1 [Sec-Fetch-Mode] => navigate [Sec-Fetch-Site] => none [Accept] => text/html,application/xhtml+xml,application/xml;q=0.9,image/avif,image/webp,image/apng,*/*;q=0.8,application/signed-exchange;v=b3;q=0.7 [User-Agent] => Mozilla/5.0 (Windows NT 10.0; Win64; x64) AppleWebKit/537.36 (KHTML, like Gecko) Chrome/131.0.0.0 Safari/537.36 OPR/116.0.0.0 [Upgrade-Insecure-Requests] => 1 [Sec-Ch-Ua-Platform] => "Windows" [Sec-Ch-Ua-Mobile] => ?0 [Sec-Ch-Ua] => "Opera";v="116", "Chromium";v="131", "Not_A Brand";v="24" [Connection] => close [X-Forwarded-Port] => 443 [X-Forwarded-Proto] => https [X-Forwarded-For] => 210.210.154.57 [X-Real-Ip] => 210.210.154.57 [Host] => lmsproxy.digitos.id [Content-Length] => [Content-Type] => )Hide X-Powered-By di Nginx
Terkadang kita perlu menyembunyikan identitas teknologi yang kita gunakan, misalnya identitas web server Nginx yang kita gunakan. Itu akan terlihat seperti di bawah ini:
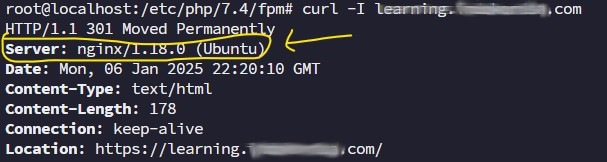
Disini kita perlu menambahkan atau mengaktifkan pada konfigurasi bagian http di /etc/nginx.conf :
server_tokens off;Dan juga tambahan library :
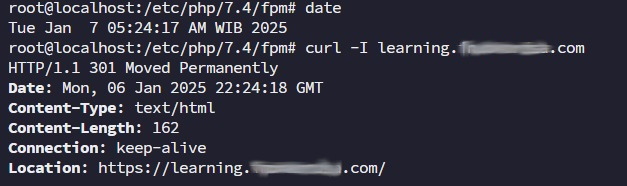
sudo apt-get install nginx-extrassetelah itu baru menambahkan kembali bagian http di /etc/nginx.conf konfigurasi di bawah ini:
more_clear_headers Server;Setelah itu jangan lupa untuk me’reload atau pun restart nginx nya
sudo systemctl reload nginxSekarang menjadi seperti ini:
Upgrade Nginx versi 1.18.0 ke versi terbaru dari Mainline (1.27.0) di Ubuntu 22.04
Saat tulisan ini dibuat, Nginx yang digunakan masih versi 1.18 yang menjadi default versi Nginx di Ubuntu 22.04, kenyataannya sudah dianggap obsolete oleh teman-teman web security karena sudah rentan dari faktor keamanan. Untuk itu sangat disarankan untuk mengupgrade nya ke versi yang lebih tinggi. Bagi yang hanya akan upgrade ke versi 1.26, silahkan lihat di sini
Apa yang membedakan antara versi stable dan mainline ?
- Stable (v 1.26): Versi yang telah teruji dengan baik dengan lebih sedikit pembaruan, cocok untuk lingkungan produksi.
- Mainline (v1.27): Pembaruan yang lebih sering dengan fitur-fitur baru, direkomendasikan bagi pengguna yang memerlukan peningkatan terkini.
Saran: Jika Anda menjalankan server produksi, disarankan untuk tetap menggunakan 1.26.2 (Stabil), bukan 1.27 (Utama).
Berikut adalah langkah-langkah upgrade nya menggunakan terminal/console
Pertama kali sebaiknya kita lakukan backup terhadap Nginx yang sekarang ada:
sudo cp -r /etc/nginx /etc/nginx.backupLakukan langkah-langkah berikut ini:
sudo apt update && sudo apt upgrade -yKita cabut atau hilangkan Nginx yang ada
sudo systemctl stop nginx
sudo apt-get autoremove nginx*
Kemudian tambahkan repository mainline NGinx
sudo add-apt-repository ppa:ondrej/nginx-mainline -y
sudo apt update
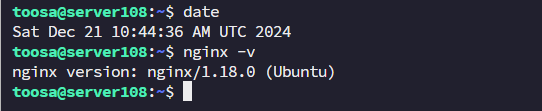
sudo apt install nginx-core nginx-common nginx nginx-full -yKita cek/periksa Nginx versi Mainline nya, perintah di bawah akan memunculkan versi terakhir yang tersedia di server:
apt-cache policy nginxEnable/aktifkan layanan Nginx
systemctl status nginx
sudo systemctl start nginx
sudo systemctl enable nginx
Berikut posisi setelah upgrade:

Semoga berhasil !
Menambahkan File JavaScript eksternal (.js) ke Moodle
Terkadang kita perlu menambahkan file javascript (*.js) ke dalam LMS Moodle yang sedang kita kembangkan. Berikut adalah langkah-langkahnya:
Masuk ke Folder Theme Anda
Pertama-tama , masuklah ke direktori /theme/Nama_Theme_Anda. Jika di dalamnya belum ada folder bernama javascript, buatlah folder baru dengan nama tersebut.
Unggah File JavaScript
Letakkan file .js yang ingin ditambahkan ke dalam folder javascript yang baru dibuat.
Edit File config.php
Buka file config.php yang berada di dalam folder theme Anda (/theme/Nama_Theme_Anda/config.php). Di bagian paling bawah file tersebut, tambahkan baris kode berikut untuk menyertakan file JavaScript Anda:
#To load the js files in your header:
$THEME->javascripts = array(‘yourfirstjsfile’,’yoursecondjsfile’); #To load the js files in your footer:
$THEME->javascripts_footer = array(‘yourfirstjsfile’,’yoursecondjsfile’);Perlu dicatat bahwa: Pada saat menambahkan nama file JavaScript dalam konfigurasi, jangan sertakan ekstensi .js. Contohnya, gunakan’youfirstjsfile’ bukan ‘yourfirstjsfile.js’.
Agar perubahan tersebut berlaku, maka kita perlu membersihkan cache situs Moodle, kemudian bersihkan cache browser dan reload.
Referensi: https://dzone.com/articles/adding-external-javascript-files-js-into-moodle
Moodle Tools (Advance)
1. MOOdle SHell
Moosh stands for MOOdle SHell. It is a commandline tool that will allow you to perform most common Moodle tasks.